Thursday, October 15, 2015

Selecting a serger stitch


When you do opt for a serged seam or edge-finish, choose the stitch that matches the needs of your garment. Keep in mind that a serger stitch with fewer threads can have a lot of strength and stretch. Stitches with more threads tend to be bulkier rather than stronger, though there are exceptions, like the superstretch, three-thread wrapped stitch. And stitches incorporating the chainstitch make a stable, nonstretchy seam.
As a rule, use a narrow stitch with fewer threads for lightweight fabrics, wrapped stitches for maximum stretch on knit seams, overlock stitches for standard seams on knits and wovens, and wider overlock stitches with the most threads for ravelly or bulky fabrics. Flatlock stitches are wonderful for sportswear that needs to be comfy on the inside, and rolled-hem stitches finish delicate sheers beautifully. Thread tensions may need adjustment depending on the particular fabric and for flatlock and wrapped stitches.
To reduce the bulkiness of serged seams that use a lot of thread, use a long stitch length. Be sure to experiment with stitch length on a sample first. If the stitches are too far apart, the resulting seam may not be strong enough, especially on loosely woven fabrics. 
On many machines, for two- and three-thread stitches, you can choose between using the left needle for a wide stitch, the right for a narrow stitch, or using the machine's rolled-hem function to produce a very narrow stitch (see the photo at left). And don't forget embellishment: Take advantage of the fact that a serger's loopers don't pierce the fabric, meaning you can use heavier, decorative thread in one or both loopers to turn a seam or edge-finish into a design element.
The names of the stitches may be confusing at first, and may vary slightly from manual to manual, but all relate to how the stitches are formed. Two-thread stitches are generally called overedge, or overcast, because the threads don't interlace at the needle. Three-, four-, and five- thread stitches are referred to as overlocked because the needle thread interlaces with the loopers to form a knot at the needle line. And when the looper thread completely encircles the edge of the fabric on some two- and three-thread stitches, the stitches are called wrapped.
Once you become familiar with the wide variety of stitches offered on sergers, you'll develop a sense of when to use a stitch. Then use them often so your garments will look better and last longer. Here are just a few of your options.

What Can My Serger Do?

Sewing with Sergers: What Can My Serger Do?

Like Jess, I can tell you I am extremely intimidated by sewing with a serger.  I'm fairly comfortable sewing with a basic machine but deciding to jump into a project with my serger was entirely out of my element.  I'm a big planner and I feel relatively okay doing new things with the wealth of information you can gain by spending a few hours online.  Learning the serger has not been so easy.  I want to say I read the manual and then immediately started sewing but that wasn't the case.

Before I get to an actual project I thought it would be helpful to explain the basic functions of a serger.  As you may already know, I received my serger as a birthday gift.  My mom bought me a Singer Professional 5 that came with 6 additional presser feet.

I was excited and then instantly thought, "wait, what can I do with a serger?"

After a lot of reading and no sewing (yet), I think I know what my serger can do.

Double Chain Stitch
  • suitable for straight seams
also used for decorative chainstitch topstitching effect 
Double Chain Stitch
Two-thread wrapped Edge Overlock (narrow)

  • provides an elegant fine finish to lightweight fabrics
  • when using clear threads the fabric appears to have an invisible edge
  • gives a couture effect and looks beautiful on finer fabrics 
    Two-thread Wrapped Edge Overlock (narrow)
Two-thread Overedge (narrow and wide)
  • used as a lightweight seam finish or a lightweight seam
  • less thread is used and does not imprint on the right side of fabric when pressed
  • creates less bulky seams (ideal for sheer or lace fabrics)
Two-thread Overedge (narrow and wide)
Three-thread Overlock (narrow)
  • most commonly used because of its versatility
  • provides professional seam finish to woven fabrics
  • beneficial in preventing loosely woven fabrics from unraveling
  • offers unlimited decorative capabilities
  • recommended for finishing seams but not reinforcing the seam 
Three-thread Overlock (narrow)
 Three-thread Flatlock (narrow and wide)
  • used decoratively to achieve the look of applied trim
  • special decorative threads are used for a textured and dramatic effect
also used to serge non-bulky seams 
Three-thread Flatlock (narrow)
Three-thread Ultra Stretch Mock Safety

  • stretches with the fabric, seam will not break when fabric is stretched
  • ideal for super-stretch knits like those used on swimwear or athletic clothing 
Three-thread Ultra Stretch Mock Safety

Four-thread Ultra Stretch Mock Safety
  • stronger than the Three-thread Ultra Stretch Mock Safety stitch
  • the additional thread provided added strength to the seam (good choice for knits and wovens)
  • works well when applying ribbing to garment (often seen on cuffs, collars, and waistbands)
Four-thread Ultra Stretch Mock Safety
Four-thread Safety Stitch
  • alternative to the Five-thread Safety Stitch
  • offers same type of Two-thread Chainstitch
  • used when sewing a medium weight woven fabric because the stitch is less bulky
Four-thread Safety Stitch
Five-thread Safety Stitch (wide)
  • combination of a Two-thread Chainstitch and Three-thread Overlock stitch
  • Suitable for woven fabrics and provides a durable seam for heavy weight fabrics (denim) 
Five-thread Safety Stitch (wide)
Five-thread Safety Stitch (narrow)
  • same benefits as Five-thread Safety Stitch (wide)
Five-thread Safety Stitch (narrow)
Cover Stitch (narrow)
  • often seen in ready to wear garments
  • two needles crate parallel rows of topstitching and one looper sews an edge finish on underside
Cover Stitch (narrow)
 Cover Stitch (wide)
  • same benefits as Cover Stitch (narrow)
Cover Stitch (wide)

Triple Cover Hem
  • professional and creative triple topstitch
  • three needles create parallel rows of topstitching and one looper sews an edge finish on underside
  • ideal for heavier fabrics
  • traditionally used in home decorating
  • adds unique accent for garment constructions
Triple Cover Hem
Three-thread Rolled Hem
  • used to finish edges of scarves, ruffles, table linens, and some garments
  • suitable for lightweight to medium weight fabrics
  • used for pintucks
Three-thread Rolled Hem
My serger came with a beading foot (used for sewing on beads, sequins, pearls, and thick cord), a blind hem foot(used for hemming skirts, paints, and other sewing projects in one easy operation), a cording foot (used for sewing piping betwe3en two layers of fabric in one easy operation), an elastic foot (used for inserting elastic into a seam), ashirring foot (used for shirring and gathering), and a taping foot (used for inserting a tape into seams that will stretch easily).

Serger's Feature

Must have features for your first serger - and those you can do without.  Great tips if you are thinking of getting one.Hi there! I’m Irene and I usually blog at Serger Pepper; today I’m here sharing with you all I know about one of my favorite topics: sergers!
Yes, I’ll do my best helping you choosing your first serger (or overlocker, depending on where you come from)… aren’t you excited? I am!
Let me start saying that the perfect model does not exist! It’s all relative!
Read what you should consider before you start evaluating the models/features:

What is a serger sewing machine?

41HN60XZM5L
Maybe you already know what a serger is/does, maybe not: let’s define it!
A serger is a fast sewing machine that produces professionally finished seams because it trims away seam allowances and encases raw edges with an overcast stitch…. wow!
Can you guess how much it reduces the boring time spent trimming and zig-zagging seam allowances? One step does everything!

Do I really need a serger?

Well, technically you don’t, but you should consider
  • why you are sewing,
  • what kind of fabric
  • how much do you usually sew.
A serger isn’t going to replace your sewing machine: some tasks are unachievable with the serger alone (topstitching, for example).
One of the advantages of using a serger, is that it’s fast!
Not only it do multiple actions in one only time, it also sews so many stitches per minute (they’re around 1300 for a domestic serger… more than 20 each second, while a sewing machine usually stitches 600/minute).
If you have decided it’s time to take your sewing up a notch… it’s time to buy a serger!
If you’re not a professional sewer (and probably you aren’t, if you’re just considering to buy a serger), you will hardly need so many fancy options: do not spend those extra money for features you are not going to use!
51WTo-b0+gL

What will you use it for?

To help you decide which features are really important for you, one of the most important things to consider is what do you think you’re going to use your serger for: no need to have a coverstitch feature if you don’t hem knits!
  • A serger can help you a lot in sewing knits (also without a coverstitch feature); let’s think about it: our wardrobe nowadays is filled with knit garments so, why do we have to sew woven and wear knits?
  • Also if you can perfectly sew knits with a regular sewing machine, a serger will make things easier, way faster and tons neater!
  • Even sewing wovens can be faster and neater with a serger: no more seam allowances fraying!
  • A serger can be the right choice also if you don’t sew garments, but do lots of bed skirts, pillows, curtains and things like this: again, more work done in less time!
That said, you should take in account that your plans may change, while the time passes by: once you climb the first steep part of the learning curve (problems threading anyone?) you will almost certainly fall in love with the endless possibilities your serger gives you.
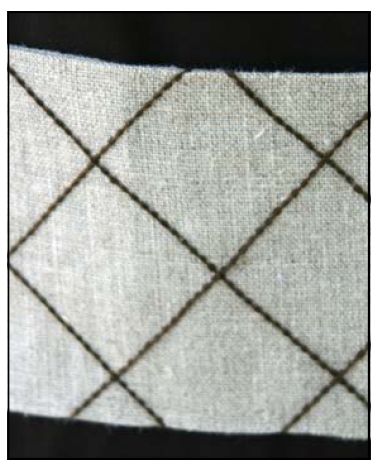
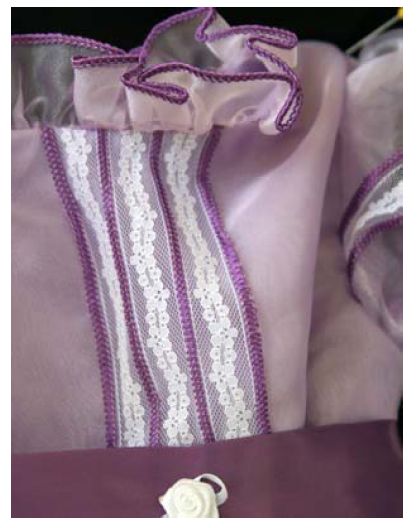
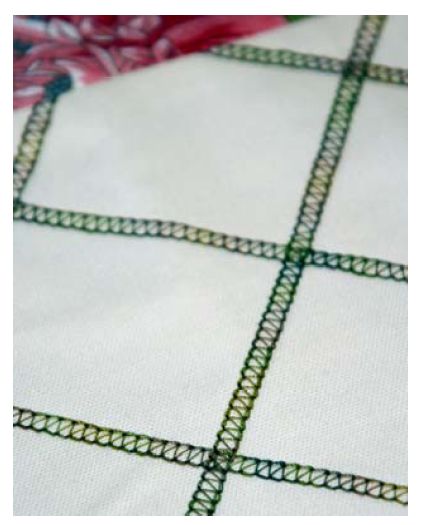
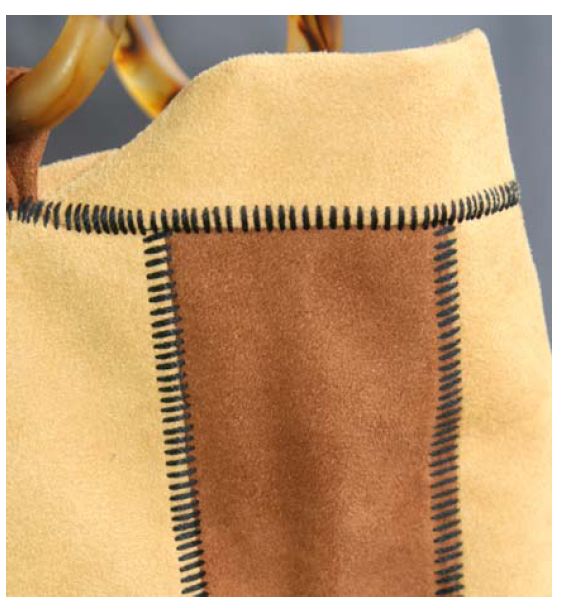
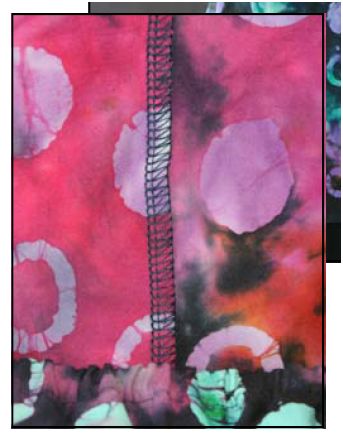
When you start playing with your serger, you’ll see that it’s perfect for adding decorative details (like edgings and pintucks), for adding strength while keeping flexibility to your seams: just start playing with the various stitches (I even have created a useful Cheat Sheet for all the settings!).
91xAYkOtVGL._SL1500_

How much are you going to use it

Another perspective to consider, to define must-have features for your first serger, is how many hours a week (or a day…) you’re going to use it: if you sew for yourself and your family, probably you’re not going to overuse it and wear it down as much as if you have a sewing business.
Not all of the domestic sergers can withstand extensive use and saving some bucks now could probably lend you to spending more in manteinance later.
Maybe you’re planning to jump into the growing wagon of crafty women who sells handmade garments on Etsy or local fairs: seams finished with an overlocker will look much more professional to the buyers, helping you in increasing your sales.

Let’s talk about money!

Everything is relative, in this field! Just honestly consider your budget: everyone has one, high or low, and price range for an overlocker is between $ 200 to several thousand dollars.
Often, you’re going to get what you pay for but:
1) For the average home sewers, a good entry-level machine will cost you around $200; there’s no need to spend too much, if you’re not going to use it intensively! [Deb – this is the one I’m getting for Christmas – the Brother 1034D]
2) It’s not always true that more expensive equals better. Sometimes you only pay for extravagant features you’ll never use (and sometimes you pay for the brand too!)
Choosing a serger is a very intimidating choice because there are so many brand and models in the market and nobody really want to make a mistake and end up paying for it twice!

Where should I buy it?

When you will have tried a lot of sergers at local dealers and narrowed to a selection of your favorite models (within your budget and basing on must-have features listed below), try to wait and search for sale prices on Amazon/eBay/Google… you could save a lot from your local retailer’s price!
TIP: Check how maintenance will work: some won’t service your serger if you’ve bought it elsewhere…

Buying new/used

In my humble opinion, it’s ok buying used sergers but only from trusted sources: you should ideally be able to check an used machine before you buy it (even better: let someone experienced test it for you, someone who can spot problems just hearing the sound of the engine, or note some warning signals you could even miss!).
If I was in the market for a new serger, and I was thinking to buy a used machine, I would try asking local dealers first: usually, when someone decide to change her machine, sells her old basic model to the dealer, who often re-sells spare parts and can recondition the serger for a fraction of cost, then he will re-sell it to you.
Be sure it comes with a sort of warranty, better if it’s written (you never know…).

It’s all fun but… which features do I *really* need?

I have to admit that, also if I’m really amazed by all those fancy features I see on high-end expensive machines, I’m not easily suggestible.
I’m a frugal mom, the kind of woman who plans any expense, since I’m not swimming in moneys… so I must carefully evaluate the cost-effect ratio of a purchase.
Also if this seems to be a huge list, most of the features I’m mentioning here are included in most (if not all) the modern home sergers; you can even carry this list with you when you’re visiting your local dealers: you’ll look less like a newbie, if you already know what to ask for!
  • Adjustable differential feed (this is a must-have for sewing different types of fabric and to create gathers). Most modern sergers have this feature, better check with the seller that it’s included, when the price is in the low-end!
  • adjustable stitch length and width
Serger Pepper - Contributor - Must have features - differential feed and stitch length
  • adjustable sewing speed by foot control on the pedal: exactly like with your sewing machine (and your car), the more you push the foot on the pedal, the faster you sew (or drive);
  • easily removable presser foot: it helps when it’s time to thread (or even change) the needles! A snap-on foot is the best choice.
Serger Pepper - Contributor - Must have features - release presser foot
  • sewing light (I’ve never seen a serger without, but I haven’t seen all the sergers for sale in the world and a bright light is a must-have)
  • colour coded threading paths and/or threading chart, better if it’s pasted on your serger
Serger Pepper - Contributor - Must have features - color coded threading and threading chart
  • thread tension released when you raise the presser foot
  • adjustable presser foot pressure, for sewing different fabric thicknesses
  • easy seam width adjustment: turning the dial you can cut more or less fabric on seam allowances, sewing closer or farther from the edge
Serger Pepper - Contributor - Must have features - cuttig width
  • removable stitch finger (and even better if it comes with 2 different width stitch fingers)
Serger Pepper - Contributor - Must have features - two fingers
  • high quality blade you can disengage, sharpen or even easily replace
Serger Pepper - Contributor - Must have features - blades
  • each needle secured by its own screw (or Allen wrench): if they’re both attached with one only screw, they will likely fall inside your serger when you decide to change them
Serger Pepper - Contributor - Must have features - two screws needles
  • dials with numbers stamped on, to help you adjusting settings
  • tweezers, manual, dust cover, spool nets (to keep consistent feeding of bulky nylon, wear those nets on the spool), spool caps (to be able to use domestic spools and reels of thread), screwdriver(s)
  • seam gauge (either built-in or removable): this will ensure the fabric is cut and sewn consistently
Serger Pepper - Contributor - Must have features - sewing gauge
  • check if the serger is easy to open for threading it or cleaning it
  • it can sew with regular home sewing machine needles
  • built-in thread cutter
Serger Pepper - Contributor - Must have features - thread cutter

Other features that can be really useful, but not mandatory, are:

  • bag to carry it around if you don’t have a sewing room
  • free arm/flat-bed convertible sewing surface: useful feature for when you need to sew on small cylindrical portions of garments (read: collars, cuffs, armholes, especially when sewing for small kids)
  • serger classes either in person or DVD/video (also if you can find plenty of them on YouTube)
  • built-in storage. This will help you get organized and keep all your sewing tools.
  • coverstitch convertible (better two separate machines, usually the conversion isn’t that easy to do and you’ll end with paying a potential feature you won’t use that much)
  • different feet (maybe on the low-end models you won’t have them all in your box, you should check if they are available to be added later and how much they cost if bought separately) – blind hem foot, elastic foot, piping/cording foot, chainstitch foot are the most common.

A couple of words about number of threads/serger stitches:

Home sergers comes with 3, 4 or even 5 threads: if you’re an average sewer/crafter, better choose a 4 (3 is for finishing seams only, 5 is for added coverstitch and chainstitch).
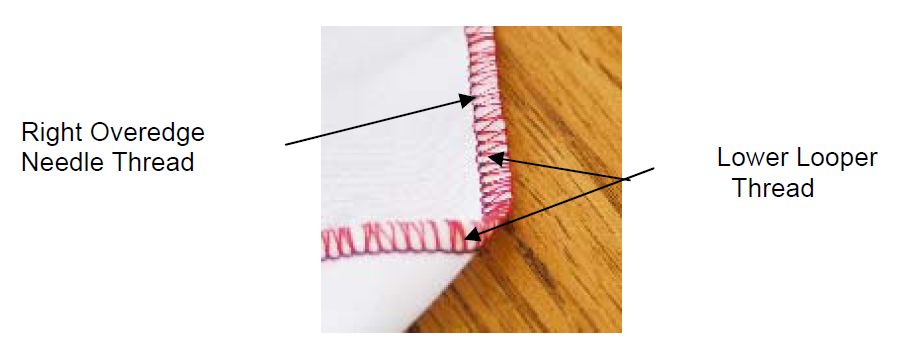
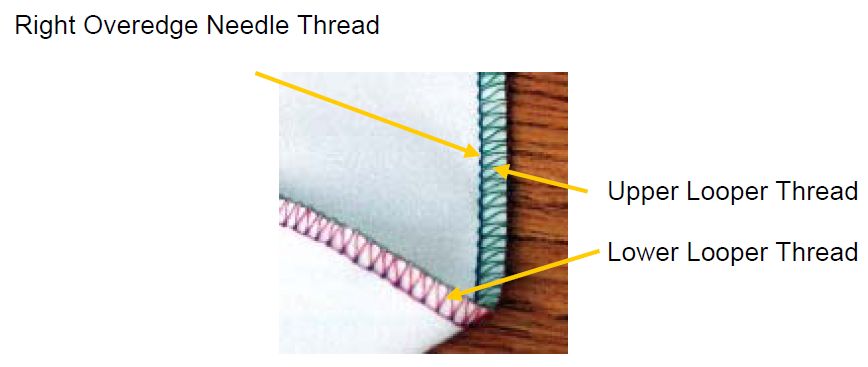
If I was in the market for my first serger, these are the stitches I’d like to be able to work with it:
  • 2 threads overlock (for finishing seam allowances on light weight and sheers)
  • 3 threads overlock (for finishing seam allowances on medium weight fabrics)
  • 4 threads overlock  (for finishing seam allowances on heavy weight fabrics and for seaming)
  • flatlock
  • rolled hem (with 2 threads, for light weight fabrics)
  • rolled hem (with 3 threads, for medium weight fabrics)
  • narrow hem
  • super stretch stitch (perfect for dancewear, swimwear, leotards…)
Another important thing to check with your dealer (better ask him/her for a demostration) is how easy is to convert your serger between stitches. Some sergers have a quick way to covert (like a leverage you turn to switch between rolled hem and overlock, or a two-thread convertor), while others may require you to unscrew the throat plate… and you know that you’re not going to convert between stitches if you need to pull apart your serger, isn’t it?

Fancy features you CAN do without

(but you should look for if your budget is a little bit wider)

My conclusions

When I’ve bought my serger, my needs were to stay within a really small budget without buying a “cheap” machine: I’m highly satisfied with it (it’s a Necchi Lock 181, which I don’t think you’ll be able to spot anywhere in the US) and I don’t plan to change it with another (unless I find one that makes me the manicure while I sew): it’s such a sturdy and durable machine, all built with metal mechanisms inside (just try to lift it and you’ll notice it by its weight!).
I hope you’ll make good use of my suggestions about must-have features for your first serger, maybe you’ve been a good girl and you’ll find a new one under the tree…
If not, here are my little pearls of wisdom for helping you choosing one, at the local dealer’s:
  • try one of the cheaper and one of the more expensive… and see if you can spot a difference
  • try threading it trying before you choose - maybe twice!
  • choose the brand/model trying it live, then buy online and spend less
  • if you are unsure between two brands/model, compare ease of use and maintenance/cleaning
  • be sure to get any sort of training and access to support after purchase
Wanna know more about your serger? Follow my “Serger Obsession” board on Pinterest!

More serger resources

Books about serging and serger projects to work on


Craftsy classes to get your started or to help your improve your serging skills


Beginner serging

Creative serging
Sew with your serger

Serger Stitches Ceat Sheet

Serger Pepper - Serger Stitches 101 Cheat Sheet PIN IT now!

Cover Stich

The Best Affordable 5 Thread Serger Machine

By   Edited Nov 13, 2013  3  7


Singer 14T968DC

If you’ve ever used or owned a serger sewing machine or if you’ve just been thinking about buying one, here’s information on what you can expect with the Singer 5 thread serger model.  If you haven’t explored sergers in a while, prepare yourself.  This is not your mother’s serger machine.  
The Singer Company has had a long history of manufacturing machines for straight stitch, quilting, embroidery, and sergers.  This newest model is sometimes referred to as “Industrial Grade” or “Professional”.  I like to refer to it as the “Dream Machine”.  It takes all those tedious tasks needed to complete a project and accomplishes them in one step.  The time you can save with this machine is one of the most notable conveniences.
5 thread serger machine(60091)
The first thing you’ll notice is its weight.  With all the features it offers, you would naturally expect it to be heavy.  Unless you travel daily with your machine, the weight factor is a good thing.  This Singer doesn’t budge on the work surface and skip across the counter during operation like some lighter machines do.  Another thing you’ll notice is how quiet it is.  It’s certainly not silent but emits a low, solid and strong rumbling like an expensive sports car.  Almost makes you want to reach for the gear shift!
Cover Stitch
One of the coolest features of this machine is the cover stitch.  When I first learned about it my only question was, “Seriously?”  Could there really be a way to do this so simply?  If you’ve ever tried to make a professional looking hem on a loose knit tee shirt, you know that a lot of finessing is required because the cut edge may tend to curl.  Typically you would need to overlock the edge of the hem and then stitch it down with your straight stitch machine, a method that is far from perfect.  Sometimes the overlock on the hem isn’t smooth or doesn’t lay perfectly flat to produce a nice clean look.  The cover stitch is a one step process that, and as it’s name indicates, covers the raw edge while sewing the hem in place with two or three rows of stitching.  It saves a lot of time and requires none of the finessing.  It’s great for creating shirt, sleeve, or skirt hems without a bulky look.  It's also the stitch to use on tee shirt necklines. 
cover stitch right side
cover stitch wrong side
cover stitch right side and wrong side
To produce the cover stitch, the serger becomes a flat surface looking much like any straight stitch machine.  Just replace the knife cover plate with the seam guide plate and the surface goes from a narrow working area to a broad flat one. 

knife cover plate
seam guide plate
knife cover plate and seam guide plate
With the seam guide plate in place, the cutting blade is disengaged and out of the way.  This allows you to place the cover stitch wherever you like, as far from the edge of the fabric as you need.  Cover stitch on this machine is available in narrow and wide and is achieved by spacing the needles close together or farther apart.
4 & 5 Thread Safety Stitch
Did you ever think you could make a garment without a straight stitch sewing machine?  The Singer serger 5 thread model makes it possible to create a complete garment with both knit and non-woven fabrics.  To secure two fabrics together you would normally sew the seam, then, if you own a 4/3/2 thread serger, finish the edge with an overlock stitch.  If you don’t own a serger, you would have to trim the seam with scissors then finish it with a zigzag or other edge treatment to prevent raveling.  On the 5 thread serger, three settings are available to create a secure chain stitch and overlock in one step. One setting is ideal for knits because it is super stretchy.  Two others are available for non-woven fabrics.
Foot Attachments
foot attachments

This model Singer serger machine packs 6 wonderful attachments right in the box, attachments that easily take on any of the chores you might not normally attempt with a machine.  If purchased separately, the cost of these feet would be substantial.  All the samples in the following photos are created with fabric scraps and are not meant to be fashion statements. : )
Blind Hem Foot
The Blind Hem foot allows you to create a hem by placing tiny tacks of stitching in the fabric.  You can adjust the spacing between these tacks.  If you select your thread color carefully the tacks are nearly invisible and it saves you the chore of hand hemming to get the same look.  This is handy for when you don’t want an obvious line of solid stitching securing the hem. 
blind hem right side
blind hem wrong side
blind hem right side and wrong side
Elastic Foot
If you’ve ever tried to control fabric going into the machine while manually attaching and evenly stretching elastic at the same time, you know how complicated this can be.  The elastic foot makes this a simple operation plus it finishes the edge.  You simply place the fabric under the foot and insert elastic.  The elastic is held in place for you and the foot stretches it as you sew.  You’re given the choice of a little bit of stretch or a lot with a turn of a pressure screw.  This is great for lingerie, waistbands, swimsuits, and children’s clothes where elastic is used quite often.  Experiment on scraps before using the foot on your finished project to determine if you have set the screw pressure appropriately for the type of fabric and elastic you’re using.
elastic foot
elastic foot slight pressure on the left, and increased pressure on the right
Cording Foot
You can attach purchased piping to a garment or create your own piping.  The cording moves under a groove in the bottom of the foot and keeps the cord under control.  The stitching is positioned directly beside the cord creating a fabric casing that’s well fitted to the cord. 
This foot also can also be used to attach an invisible zipper.  The teeth of the zipper pass under the foot allowing the machine to stitch close to the zipper edge creating a perfectly installed invisible zipper.  Plastic zippers can be installed too if the zipper will have a fabric overlap, otherwise the teeth of the zipper will be exposed. 
cording foot
invisible zipper
attach cording, create cording, or install an invisible zipper
Bead/Sequin Foot
The beads or sequins pass through a holder which guides them in place as you sew.  By adjusting the stitch length and width you can create a fine stitch that attaches the beads to the edge of the fabric. This is an excellent tool for any decorative finish using beads, sequins or other trims by the yard.
beading foot
beads attached to sheer fabric with beading foot
Taping Foot
This foot helps you to attach decorative or structural tape to a fabric.  The tape feeds into the foot and is automatically carried and stitched onto the fabric.  This is very helpful any time you need to attach stay tape for structure in a garment to keep it from stretching out of shape.  The shoulder seams of a loose knit shirt are a good example.  The tape can be attached and the raw edge finished in one operation.  Use this foot to also attach decorative bias tape or ribbon trim.
Shirring Foot
The beauty of this machine is the one step operation, especially when it entails shirring.  Gathering, sometimes called ruffling or shirring, can be done efficiently on this serger.  Whether you’re making little girls clothes or curtains, tiered skirts or anything that needs to be gathered, this is an extreme time saver.  The shirring foot can be used to gather fabrics while overlocking the edge and can be adjusted for anything from a light pucker to a full gather.  Want to create a ruffle attached to another piece of fabric?  Feed both pieces into the shirring foot, and watch as the machine does it for you.
shirring 1
shirring 2
fabric can be shirred, overlocked and attached to another layer of fabric in one step
Singer Support
Singer is really generous when it comes to explaining the threading procedure for the serger with multiple, helpful explanations and charts.  It’s logical they would make this a priority because if you can’t thread the machine, you’ll never get to see all the wonderful things it can do. A small chart of stitches is displayed boldly on the front of the machine. 
stitch chart
It clearly indicates which threads are necessary to achieve each type of stitch.  Color-coding on the inside and outside of the machine is also enormously helpful when it’s time to thread the machine. All of this is fully covered in the owner’s manual. 
threading
color coding aids in threading
Although Singer seems to have addressed just about everything, there is some information where they fall short.  After searching ALL the information and pdfs offered online at Singer I couldn’t find a couple of explanations I was looking for.  I emailed Singer customer service explaining what I needed in excruciating detail and letting them know I had already been through all the pdfs and other information they offer online.  I received a prompt response that directed me to check out the many pdf files available!  This was obviously an automated and unsatisfactory response and Singer would do well to improve on their communications with customers.  I ultimately found the information I needed in another way, which I’ll explain later.
Here are just a few things omitted in the sewing manual that comes with the machine. 
• When you move the stitch width dial you can actually see the cutting blade move left and right at the front of the machine which helps you to better understand the cutting width function.  
• When using the shirring foot, differential feed must be engaged.  The shirring foot alone doesn’t gather fabric.  It’s the combination of the shirring foot AND the differential feed that does the job.
• When using the shirring foot the needles will be in the back row position.
 • Adjusting the stitch length will produce different results when shirring.  Another adjustment you can make is to increase the tension on the needle thread.